Metlab has over 1,500 customers and heat treats a variety of parts and materials to different specifications. The specifications which are adhered to are either customer standards or processing requirements dictated by the SAE AMS (Society of Automotive Engineers/Aerospace Material Specifications). Metlab is committed to providing quality in every step of its production processes and strictly adheres to all of the requisite standards specified by its customers.
The company has four metallurgists on staff, including not only top management, but a Quality Assurance Manager and Laboratory Manager. The QA Manager responsibilities are the monitoring, documenting and ensuring that specifications are being met and a consistent high- level of quality is achieved for every part processed. Metlab has an in-house metallurgical laboratory for testing the parts, or samples from heat treat lots for conformance to customer requirements.
Each job that comes into Metlab has some form of specification which accompanies the part or component. It might be as simple as a desired hardness range, or more complicated, incorporating case depth, tensile strength, impact properties or other mechanical property requirements. In some cases, the specifications conflict with the process or desired result, and other times they are somewhat “loose” and require clarification.
Other jobs have multiple specifications which need to be met through several processes. As an example, heat treating to AMS 2759, which is a general overview specification followed by black oxide finishing to MIL-DTL-13924. Or adherence to AMS 2750, which dictates temperature uniformity of furnaces. Metlab has on its staff several industry experts, including its Director of Operations, who is on the AMEC Committee (Aerospace Material Engineering Council). This group writes and edits the AMS specifications to provide clarification and guidance to the customers to achieve the correct results for heat treated product is achieved.
At the beginning of the process, each job is reviewed thoroughly and documented with a Shop Order Process Requirement Form. This form is issued to the shop when the order is released for production. Simultaneously, an Order Acknowledgement Form is e-mailed or faxed to the customer acknowledging receipt and acceptance of the order, and providing an estimated shop date. The Shop Order Process Requirement Form has the instructions necessary to process the job as it moves throughout the shop floor. Its focus is to provide specific information for each step in the process. A test piece also accompanies the job and is evaluated at the end of the process ensure quality, aesthetics and specification requirements.
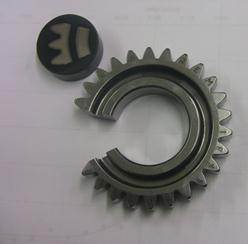
Test piece from a gear heat treating project. Note that a segment of the gear has been removed, mounted and polished so it can be evaluated for microstructure and case depth.
Each Metlab furnace is equipped with a monitoring system to check temperature, uniformity, gas flows, pressure, and other process variables. While most of the furnaces are automatically controlled, furnace operators are watching and checking as a back-up for any changes in process or possible variables that could affect the quality of the heat treat lot.
Furnace controls are calibrated quarterly as well as furnace temperature uniformity checked twice a year to ensure adherence to AMS specifications. And any thermocouples used to control or monitor temperatures are calibrated to NIST standards. Metlab furnace operators undergo rigorous training not only in the operation of furnaces and related processing equipment, but also basic metallurgical principles so that they have insight into the overall heat treatment procedures to treat different materials.
After the job has gone through the production process, a part or multiple parts are tested to check that the job meets specifications and quality level. These pieces may be checked for conformance to hardness or other mechanical properties. And parts are inspected visually as well. Hardness testers, microscopes and dimensional measuring equipment are all calibrated according to a fixed schedule.
Once a part clears the production process inspection, it goes to the Quality Control manager for final review. Upon approval, a Quality Certification is developed and shipped with the parts to the customer.
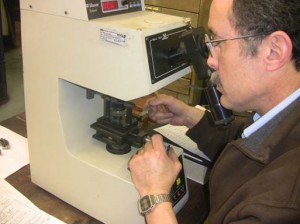
Laboratory Manager testing microhardness on a cut, mounted and polished sample to ensure that case depth specification is met.
High-quality is a constant focus and core competency throughout the company and an emphasis on quality is part of the company Mission Statement. Metlab furnace operators undergo rigorous training not only in the operation of furnaces and related processing equipment, but also basic metallurgical principles so that they have insight into the overall heat treatment procedures to treat different materials.
And on-going safety training of all employees, conducted by recognized and accredited industry experts for all aspects of shop operations is key as well. Metlab processes parts for critical applications and is able to achieve consistent quality levels. The QC organization is well versed in working with on-site auditors for special jobs, crucial parts and components. It is not unusual to see a Government Source Inspector or outside customer auditor at Metlab working to verify that the requirements of heat treated components has been met before parts are allowed to ship.


